Log in to Roihu
‼️ To begin make sure you have a user account at CSC that is a member of a project which has access to the Roihu service and perhaps Allas. Note that there’s a small delay before one can login to Roihu after creating a new project and adding services.
‼️ In order to log in with SSH from the command-line, you must have also set up SSH keys and uploaded your public key to MyCSC. See the previous tutorial.
Roihu web interface
💬 Connecting via the Roihu web interface is an easy way to access the Roihu supercomputer.
- Open a web browser and go to https://www.roihu.csc.fi
- Login with your CSC account (or Haka/Virtu)
- You have now connected to Roihu!
💭 The Roihu web interface landing page looks like this:
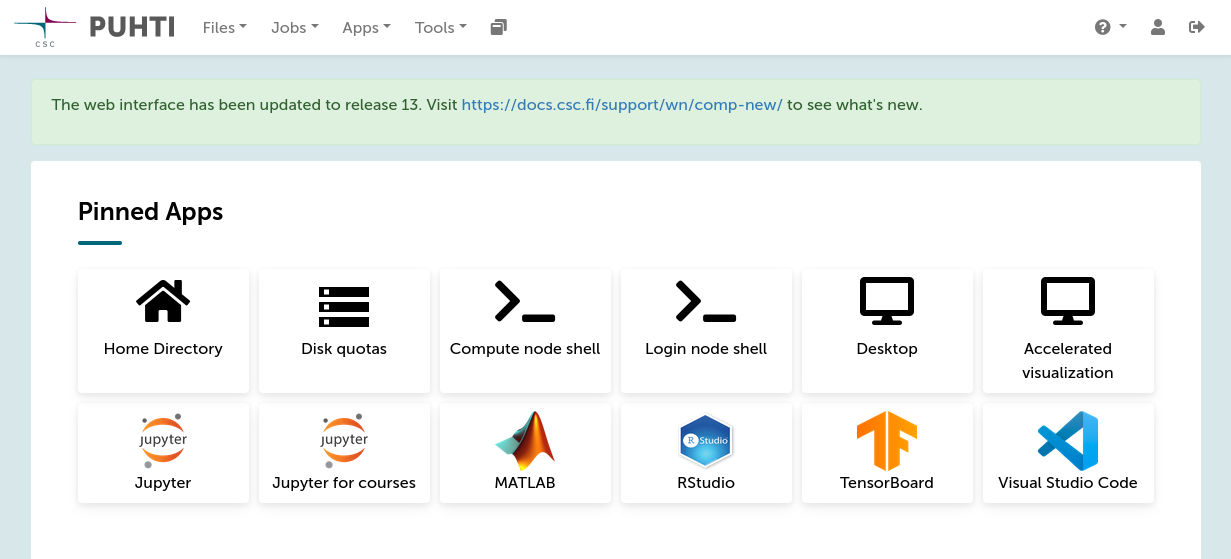
💡 From the pinned apps and top menus you can, for example, access your files and open some applications or a command-line interface.
Connecting with SSH from the command-line
‼️ Roihu has separate login nodes for CPU and GPU usage. This tutorial assumes that you want to connect to Roihu CPU login nodes roihu-cpu.csc.fi. To use the GPU resources, you need to connect to the GPU login nodes roihu-gpu.csc.fi.
💬 The basic Command-Line Interface (CLI) in Unix-based systems is the Terminal.
💡 Different operating systems have slightly different CLIs and SSH clients, i.e. programs that you can use to connect to the supercomputers.
Connecting from Linux and macOS
💬 Laptops and workstations running Linux or macOS typically have SSH pre-installed.
Find the Terminal on your computer:
-
Open a terminal and type (replace
cscusernamewith your CSC username):ssh cscusername@roihu-cpu.csc.fi-
Note! If you have saved your SSH key with a non-default name or in a non-default location, please specify the path to your key using the
-ioption:ssh cscusername@roihu-cpu.csc.fi -i /path/to/private/key
-
-
You may be prompted to type your SSH key passphrase.
💡 To avoid having to type your passphrase every time you connect to a CSC supercomputer, the
ssh-agentutility can hold your keys in memory. Usingssh-agentis not necessary, but makes using SSH keys very convenient!- On Linux systems,
ssh-agentis typically configured and run automatically at login and requires no additional actions on your part. -
On macOS systems, you should add the following lines to the
~/.ssh/configfile:Host * UseKeychain no AddKeysToAgent yes
- On Linux systems,
-
Scroll down to In Roihu.
Connecting from Windows
💬 On Windows you have different options:
- You can use the Roihu web interface to connect with your browser (easiest, see above).
- You can download and install MobaXterm.
- You can download PuTTY.
- You can use the Windows PowerShell. See Docs CSC.
‼️ The following steps assume you use MobaXterm. More examples can be found in Docs CSC.
- Launch MobaXterm from the applications list (opens from the Windows logo), or search for it in the bottom bar search box.
- Click Session in the top-left corner and select SSH.
- In the Basic SSH settings section, write
roihu-cpu.csc.fiin the Remote host field. - Tick the Specify username box and enter your CSC username. The Port number can be left as 22 (default).
- In the Advanced SSH settings section, tick the Use private key box and add the path to the SSH private key you generated in the previous tutorial.
-
Click OK. If it is the first time you are connecting to Roihu, click Accept.

-
You are asked to enter your SSH key passphrase.
💡 To avoid having to type your passphrase every time you connect, you may enable the MobAgent authentication agent in the program settings, Settings > SSH > SSH agents. Tick the Use internal SSH agent “MobAgent” box and select the key(s) you want to load.
-
You’ve now connected to Roihu!
💡 The next time you want to login to Roihu, just select it from the User session menu on the left!
💡 Note, you may also login with MobaXterm using the plain
sshcommand similar to Linux and macOS (see image below).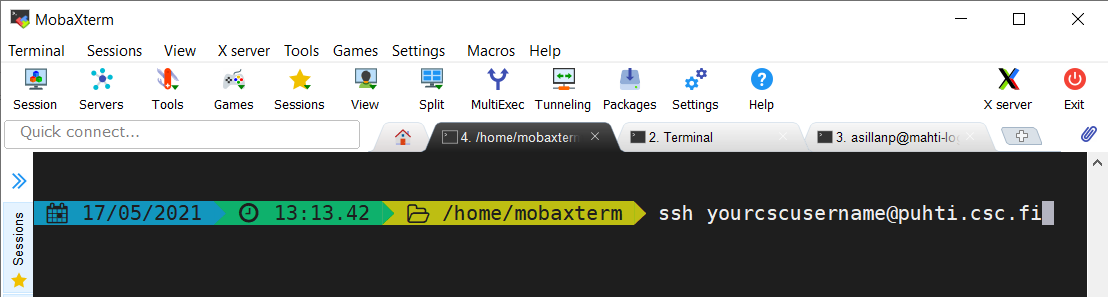
In Roihu
-
If you’re connecting to Roihu (or a specific Roihu login node) for the first time, SSH will ask you if you trust the authenticity of the host:
The authenticity of host 'roihu-cpu-login4.csc.fi' can't be established. ECDSA key fingerprint is SHA256:kk0Tar9opQ+6Gq0GWJdWVVvFEMeI6kW1DW1VOYveT5c. Are you sure you want to continue connecting (yes/no/[fingerprint])? - The first time you connect, you need to accept, but the key should not change for the next login.
- Pay attention to whether you logged in to
roihu-cpu-login1,roihu-cpu-login2,roihu-cpu-login3orroihu-cpu-login4. -
Once you’ve logged in you’ll see a greeting starting something like this:
┏━━━━━━━━━━━━━━━━━━━━━━━━━━━━━━━━━━━━━━━━━━━━━━━━━━━━━━━━━━━━━━━━━━━━━━━━━━━━━┓ ┃ CSC - Tieteen tietotekniikan keskus - IT Center for Science ┃ ┃ ┃ ┃ ██████▙▄▄▄ ▗▄▟████▙▄▖ ▌ ▌ ▌ ▌ ▌ ┃ ┃ ███████████▙ ▟████████████▙ █▙▄▁ █▙▄▁ █▙▄▁ █▙▄▁ █▙▄▁ ┃ ┃ ▔▀▜█ ▀████ ▗█████▀▘ ▝▀█████▖ ████ ████ ████ ████ ████ ┃ ┃ ▐ ▄████ ▟███▛ ▜███▙ ████ ████▄▄▄▄▄▄████ ████ ████ ┃ ┃ ███████████▘ ████▌ ▐████ ████ ██████████████ ████ ████ ┃ ┃ ██████████▙ ▐████▖ ▗████▌ ████ ████▀▀▀▀▀▀████ ████ ████ ┃ ┃ ████ ████▙ ▀█████▙▄▄▟█████▀ ████ ████ ████ ▀████▄▄▄▟████▛ ┃ ┃ ▔▀▜█ ▀████▖ ▝▀██████████▀▘ ▔▀▜█ ▔▀▜█ ▔▀▜█ ▝██████████▀ ┃ ┃ ▐ ▀▀▀▀ ▝▀▀▀▀▘ ▐ ▐ ▐ ▝▀▀▀▀▘ ┃ ┃ ┃ ┃ Roihu.csc.fi - Bull BullSequana XH3000 ┃ ┃ 486 AMD Turin CPU nodes - 132 Nvidia GH200 GPU nodes ┃ ┃ ┃ ┠─── Links ───────────────────────────────────────────────────────────────────┨ ┃ Documentation: https://docs.csc.fi ┃ ┃ Account management: https://my.csc.fi ┃ ┃ Getting started guide: https://docs.csc.fi/support/tutorials/roihu ┃ ┃ Web interface: https://roihu.csc.fi ┃ ┃ ┃ ┃ ┃ ┠─── Info ────────────────────────────────────────────────────────────────────┨ ┃ All GPU jobs should be launched from roihu-gpu login node, and ┃ ┃ all CPU jobs should be launched from roihu-cpu login node ┃ ┃ ┃ ┃ Available modules can be listed with module avail and module spider ┃ ┃ ┃ ┠─── News ────────────────────────────────────────────────────────────────────┨ ┃ ┃ ... ┃ ┃ ┗━━━━━━━━━━━━━━━━━━━━━━━━━━━━━━━━━━━━━━━━━━━━━━━━━━━━━━━━━━━━━━━━━━━━━━━━━━━━━┛ [cscusername@roihu-cpu-login4 ~]$ - Now, you’re ready to go!
-
Let’s do our first small task in Roihu: let’s check our projects and that we have a one with access to Allas service!
csc-projects module load allas allas-conf- The first command
csc-projectslists your projects. - The second command
module load allasloads the Allas tools in your use. - The third command
allas-confsets up the connection to Allas: it will ask for your CSC password, and then you need to select which project you want to use (by typing the number of the project, for example2).- If you don’t see a project here, please return to CSC account and project tutorial and ensure that you have a project with access to Allas service. Please note that it can take up to an hour after accepting the terms of use before the service is in use.
- The first command
Remote graphics
💬 Remote graphics may not work by default. Try the Roihu web interface for running graphical applications.
💬 Another option is to enable X11-tunneling as follows.
On Linux and macOS
-
Add X11-tunneling to your SSH connection by adding
-Xor-Yto yoursshcommand like this (replacecscusernamewith your CSC username):ssh -X cscusername@roihu-cpu.csc.fi -
Note that on Mac you need to have an X server running, for example XQuartz. You also need to set in your
.bashrc:export DISPLAY=:0
On Windows
- MobaXterm will actually tunnel the connection by default!
- PuTTY requires that an X server is installed and running. One of the options is Xming.
- In PuTTY, X11 forwarding is enabled in the connection settings: Connection > SSH > X11: Enable X11 forwarding.
☝🏻 For intensive remote graphics we recommend using the Roihu web interface.